Moving keyboard buttons to a cup

A while ago I did a rough prototype of a game controller using one of the coffee mugs from my kitchen. I chose the coffee mug for two main reasons. Firstly it is an object which most people are familiar with. One of my assumtions with "homemade" game controllers is that familiarity makes them easier for people to interact with. Secondly I found the circular shape of the coffee mug interesting from an interaction point of view. Aside from the handle I think the circular shape is the most characteristic feature of a coffee mug. I therefore chose to base the controller interaction on this feature. Maybe a piece of iPod inspiration was also lingering in the back of my head at the time. I don't really know.
When setting up the prototype I wanted to keep it simple and avoid sensors and microcontrollers. Inspired by my classmate Anders Kjeseth Valdersnes I went ahead and picked apart two discarded keyboards. I then attached wires to a selected range of buttons on the keyboard and led the wires from the keyboard to the outer surface of the cup. I thereby effectively moved the buttons from the keyboard to the cup.
The interaction with the relocated "buttons" was set up slightly different from one prototype to the next. In the first version (seen in the top image) one only needed to slide a slightly moist finger along the rim where the wires were exposed. When the finger touched two horisontal wires at the same time it would register as a key being pressed . This meant that the interaction was rather gentle, but unfortunately the connection to the keyboard itself was very fragile. From one day to the next the connection on some keys would be lost and I would have to attach them again and again. I therefore chose to make a second prototype (seen in the image below).
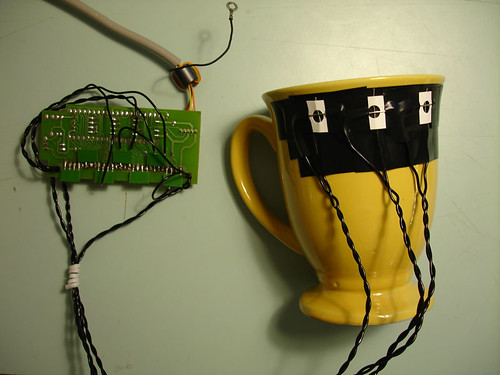
The second prototype was much more robust. None of the connections have been lost yet and the prototype has been in relatively heavy use the last couple of days. This prototype was set up by soldering attachment sockets directly onto the keyboard "chip" and then simply placing wires into these sockets.
In the same way as with the first protoype the wires were then taped to the rim of the cup. However it turned out that a simple touch wasn't necessary to create a closed circuit with this setup. The wires had to be in physical contact with each other and therefore more pressure was needed to activate the buttons. In order to get the wires to connect easily I mounted them across each other separated by a piece of paper. When enough force was applied the wires would connect and register as a key being pressed.
I then created a game for the coffee mug to control and did some user tesing. More on that to come...
posted by Are at 13:53
![]()

1 Comments:
Hi just wondered how you wired up the cup to the chip. I am wishing to make a trigger device for ableton. THis will allow me to trigger the program to do somthing. I was hoping to connect the chip to a series of buttons inside a box. Then when one button is pressed, the signal is sent to the computer as if i have pressed a key. I only need to know how to do this for the number keys and nothing else. Any help would be much apreciated. Thanks, George
Post a Comment
<< Home